
WEB APPLICATION DEVELOPMENT
LAB
(R20A1281)
LABORATORY MANUAL
B.TECH
(III YEAR – I SEM)
(2022-2023)
DEPARTMENT OF
INFORMATION TECHNOLOGY
MALLA REDDY COLLEGE OF ENGINEERING &
TECHNOLOGY
(Autonomous Institution – UGC, Govt. of India)
Recognized under 2(f) and 12 (B) of UGC ACT 1956
(Affiliated to JNTUH, Hyderabad, Approved by AICTE - Accredited by NBA & NAAC – ‘A’ Grade - ISO 9001:2015 Certified)

Maisammaguda, Dhulapally (Post Via. Hakimpet), Secunderabad – 500100, Telangana State, India
DEPARTMENT OF INFORMATION TECHNOLOGY
Vision
To acknowledge quality education and instill high patterns of discipline
making the students technologically superior and ethically strong which
involves the improvement in the quality of life in human race.
Mission
To achieve and impart holistic technical education using the best of
infrastructure, outstanding technical and teaching expertise to establish
the students into competent and confident engineers.
Evolving the center of excellence through creative and innovative
teaching learning practices for promoting academic achievement to
produce internationally accepted competitive and world class
professionals.

PROGRAMME EDUCATIONAL OBJECTIVES (PEOs)
PEO1 – ANALYTICAL SKILLS
1. To facilitate the graduates with the ability to visualize, gather information, articulate,
analyze, solve complex problems, and make decisions. These are essential to address the
challenges of complex and computation intensive problems increasing their productivity.
PEO2 – TECHNICAL SKILLS
2. To facilitate the graduates with the technical skills that prepare them for immediate
employment and pursue certification providing a deeper understanding of the technology in
advanced areas of computer science and related fields, thus encouraging to pursue higher
education and research based on their interest.
PEO3 – SOFT SKILLS
3. To facilitate the graduates with the soft skills that include fulfilling the mission, setting goals,
showing self-confidence by communicating effectively, having a positive attitude, get
involved in team-work, being a leader, managing their career and their life.
PEO4 – PROFESSIONAL ETHICS
To facilitate the graduates with the knowledge of professional and ethical responsibilities by paying
attention to grooming, being conservative with style, following dress codes, safety codes,and
adapting themselves to technological advancements.

PROGRAM SPECIFIC OUTCOMES (PSOs)
After the completion of the course, B. Tech Computer Science and Engineering, the graduates will
have the following Program Specific Outcomes:
1. Fundamentals and critical knowledge of the Computer System:- Able to Understand the
working principles of the computer System and its components , Apply the knowledge to
build, asses, and analyze the software and hardware aspects of it .
2. The comprehensive and Applicative knowledge of Software Development: Comprehensive
skills of Programming Languages, Software process models, methodologies, and able to plan,
develop, test, analyze, and manage the software and hardware intensive systems in
heterogeneous platforms individually or working in teams.
3. Applications of Computing Domain & Research: Able to use the professional, managerial,
interdisciplinary skill set, and domain specific tools in development processes, identify the
research gaps, and provide innovative solutions to them.

PROGRAM OUTCOMES (POs)
Engineering Graduates will be able to:
1.
Engineering knowledge
: Apply the knowledge of mathematics, science, engineering
fundamentals, and an engineering specialization to the solution of complex engineering
problems.
2.
Problem analysis
: Identify, formulate, review research literature, and analyze complex
engineering problems reaching substantiated conclusions using first principles of
mathematics, natural sciences, and engineering sciences.
3.
Design / development of solutions
: Design solutions for complex engineering problems
and design system components or processes that meet the specified needs with
appropriate consideration for the public health and safety, and the cultural, societal, and
environmental considerations.
4.
Conduct investigations of complex problems
: Use research-based knowledge and
research methods including design of experiments, analysis and interpretation of data,
and synthesis of the information to provide valid conclusions.
5.
Modern tool usage
: Create, select, and apply appropriate techniques, resources, and
modern engineering and IT tools including prediction and modeling to complex
engineering activities with an understanding of the limitations.
6.
The engineer and society
: Apply reasoning informed by the contextual knowledge to
assess societal, health, safety, legal and cultural issues and the consequent
responsibilities relevant to the professional engineering practice.
7.
Environment and sustainability
: Understand the impact of the professional engineering
solutions in societal and environmental contexts, and demonstrate the knowledge of, and
need for sustainable development.
8.
Ethics
: Apply ethical principles and commit to professional ethics and responsibilities and
norms of the engineering practice.
9.
Individual and team work
: Function effectively as an individual, and as a member or
leader in diverse teams, and in multidisciplinary settings.
10.
Communication
: Communicate effectively on complex engineering activities with the
engineering community and with society at large, such as, being able to comprehend and
write effective reports and design documentation, make effective presentations, and give
and receive clear instructions.
11.
Project management and finance
: Demonstrate knowledge and understanding of the
engineering and management principles and apply these to one’s own work, as a
member and leader in a team, to manage projects and in multi disciplinary environments.
12.
Life- long learning
: Recognize the need for, and have the preparation and ability to
engage in independent and life-long learning in the broadest context of technological
change.

MALLA REDDY COLLEGE OF ENGINEERING & TECHNOLOGY
Maisammaguda, Dhulapally Post, Via Hakimpet, Secunderabad – 500100
DEPARTMENT OF INFROMATION TECHNOLOGY
GENERAL LABORATORY INSTRUCTIONS
1. Students are advised to come to the laboratory at least 5 minutes before (to the starting time), those who
come after 5 minutes will not be allowed into the lab.
2. Plan your task properly much before to the commencement, come prepared to the lab with the synopsis /
program / experiment details.
3. Student should enter into the laboratory with:
a. Laboratory observation notes with all the details (Problem statement, Aim, Algorithm, Procedure,
Program, Expected Output, etc.,) filled in for the lab session.
b. Laboratory Record updated up to the last session experiments and other utensils (if any) needed in the
lab.
c. Proper Dress code and Identity card.
4. Sign in the laboratory login register, write the TIME-IN, and occupy the computer system allotted to you
by the faculty.
5. Execute your task in the laboratory, and record the results / output in the lab observation note book, and
get certified by the concerned faculty.
6. All the students should be polite and cooperative with the laboratory staff, must maintain the discipline
and decency in the laboratory.
7. Computer labs are established with sophisticated and high end branded systems, which should be utilized
properly.
8. Students / Faculty must keep their mobile phones in SWITCHED OFF mode during the lab sessions.Misuse
of the equipment, misbehaviors with the staff and systems etc., will attract severe punishment.
9. Students must take the permission of the faculty in case of any urgency to go out ; if anybody found
loitering outside the lab / class without permission during working hours will be treated seriously and
punished appropriately.
10. Students should LOG OFF/ SHUT DOWN the computer system before he/she leaves the lab after
completing the task (experiment) in all aspects. He/she must ensure the system / seat is kept properly.
Head of the Department Principal

Objectives:
To develop an ability to design and implement static and dynamic website
Choose best technologies for solving web client/server problems
Create conforming web pages
Use JavaScript for dynamic effects
To prepare PHP scripts
Use JavaScript & PHP to validate form input entry
Understand, analyze and create XML documents and XML Schema
Understand, analyze and build web applications using PHP
Use appropriate client-side or Server-side applications
Handling Cookies and Sessions using PHP, SERVLETS and JSP
Manage normal and abnormal interactions with databases using JDBC.
Outcomes:
Upon successful completion of this course, the students will be able to:
Design and implement dynamic websites with good aesthetic sense of designing and latest
technical know-how's
Create web pages using HTML and Cascading Styles sheets
Analyze a web page and identify its elements and attributes
Create dynamic web pages using JavaScript
Build web applications using PHP
Create XML documents and XML Schema
Understand, analyze and apply the role of languages like HTML, CSS, XML, JavaScript, PHP,
SERVLETS, JSP and protocols in the workings of the web and web applications
Have a Good grounding of Web Application Terminologies, Internet Tools,
E – Commerce and other web services
Develop interactive web applications using HTML forms and servlets.
Use request and response objects provided to a servlet to read parameters and to
produce an HTML response.

Develop JSP applications implementing Session management and Data base
Connectivity.

INDEX
S.No
List of programs
Pg.No.
1
Write an XML file to display the Book information which includes the
following:
1) Title of the book 2) Author Name 3) ISBN number 4) Publisher name 5)
Edition 6) Price
2
Design an XML document to store information about a student in an
engineering college affiliated to JNTU
3
JDBC:
a. Write a program to select a query using JDBC.
b. Write a program to update customer information using JDBC.
4
SERVLETS:
a. Write a program to generate a plain text.
b. Write a program to display cookie id.
5
JAVA SERVER PAGES:
a. Write a program to represent basic arithmetic functions.
b. Write a program to display a string.
c. Write a program to create check boxes.
6
JAVA BEANS:
a. Write a program to generate plain text.
b. Write a simple web-based Hello World application using Spring
MVC framework.
c. Write a simple web-based Hello World application using Spring
Django framework

WEEK 1:
Design the following static web pages required for an online book store web site.
1) HOME PAGE: The static home page must contain three frames.
2) LOGIN PAGE
3) CATOLOGUE PAGE: The catalogue page should contain the details of all the books
available in the web site in a table.
4) REGISTRATION PAGE
Aim: Design the following static web pages required for online book store.
1. Home page:- the static home page must contains three pages
2. Top frame:- logo and college name and links to homepage, login page, registration page
and catalogue page
3. Left frame:- at least four links for navigation which will display the catalogue of
Respective links
4. Right frame:- the pages to links in the left frame must be loaded here initially it Contains
the description of the website.
DESCRIPTION: In this program the entire web paged are created by using basic HTML
tags. Home page is divided into 3 frames by using <frameset> and <frame> tags. A frame is
used to display a web page within a web page.
<frameset>:
The <frameset> tag defines a frameset.
The <frameset> element holds one or more <frame> elements.
Each <frame> element can hold a separate document.
The <frameset> element specifies HOW MANY columns or rows there will be in the
frameset, and HOW MUCH percentage/pixels of space will occupy each of them.
<frame>:
The <frame> tag defines one particular window (frame) within a <frameset>.
Each <frame> in a <frameset> can have different attributes, such as border, scrolling,
the ability to resize, etc.
PROGRAM:
home.html:
<frameset rows="40%,*">
<frame src="top.html" noresize scrolling="NO" name="topframe">
<frameset cols="15%,*">
<frame src="left.html" noresize scrolling="NO" name="leftframe">
<frame src="right.html" noresize name="rightframe" scrolling="auto">
</frameset>
</frameset>
top.html:
<html>
<head>
<title>Top Frame</title>
</head>
<body bgcolor="YellowGreen ">
<img src="images/logo1.png" width="125" height="115" align="left">

<img src="images/cse.png" width="125" height="115" align="right">
<center>
<marquee bgcolor="yellow" width="650" behavior="alternate">
<font face="Brush Script MT" size="8" color="green"><b><i>Online Book Store</i></b>
</font>
</marquee> <br>
<font face="Brush Script" size="6" color="white"><b>Created & Maintained By
MRCET</b></font>
</center>
<br>
<table width="100%" height="50%" cellspacing=10>
<tr align="center">
<td> <a href="Home.html" target="_parent"><font face="Brush Script" size="6"
color="navy">HOME </a> </td>
<td> <a href="login.html" target="rightframe"><font face="Brush Script" size="6"
color="navy">LOGIN</a> </td>
<td> <a href="registration.html" target="rightframe"> <font face="Brush Script"
size="6" color="navy">REGISTER </a> </td>
<td> <a href="catalogue.html" target="rightframe"> <font face="Brush Script"
size="6" color="navy">CATALOGUE</a> </td>
</tr>
</table>
</body>
</html>
left.html:
<html>
<body align="center" bgcolor="bisque"> <br>
<a href="cse.html" target="rightframe"><font size="6">CSE</font></a><br><br>
<a href="ece.html" target="rightframe"><font size="6">ECE</font></a><br><br>
<a href="eee.html" target="rightframe"><font size="6">EEE</font></a><br><br>
<a href="mech.html" target="rightframe"><font size="6">MECH</font></a><br>
</body>
</html>
right.html:
<html>
<body bgcolor="orange">
<center>
<img src="images/Books.jpg" height="170"><br>
<font face="Brush Script MT" size="5" color="blue">
<h1><b>Welcome to the Online Book Store!!!</b></font><br />
<font face="Brush Script MT" size="5" color="red">
<h2><b> "A Huge Collection Of Engineering E-Books"</b></h2></font>
</center>
</body>
</html>

cse.html:
<html>
<head><title>CSE</title></head>
<body bgcolor="cyan">
<center><font color="blue"><h1>Computer Science and Engineering</h1></font></center>
<br>
<table align="center">
<tr>
<td>Text Books</td>
<td>
<select >
<option value="select the book" selected>Select the book
<option value="C&Ds">C&Ds
<option value="Ads">Ads
<option value="Java">Java
<option value="Oracle">Oracle
<option value="Ms SQL Server">Ms SQL Server
<option value="MySql">MySql
</select>
</td></tr>
<tr>
<td>Quantity</td>
<td><input type="text" id="q"></td>
</tr>
<tr>
<td></td>
<td>
<form method=post action="order.html">
<input type="submit" value=ok />
</form>
</td>
</tr>
</table>
<center>
<pre> Cost of one book is"500" + shipping "100" </pre>
</center>
</body>
</html>
ece.html:
<html>
<body bgcolor="Plum">
<h1><font color="blue">Electronics and Communication Engineering</font></h1>
<h2>
<ul>
<li>Digital Circuits</li> <li>Signals and Systems</li> <li>Digital Communication</li>
</ul>
</h2>
</body>
</html>

eee.html:
<html>
<body bgcolor="Plum">
<h1><font color="blue">Electrical and Electronics Engineering</font></h1>
<h2>
<ul type="square">
<li>Concepts in Electric Circuits</li>
<li>Introduction to Electronic Engineering</li>
<li>Electrical Power</li>
</ul>
</h2>
</body>
</html>
mech.html:
<html>
<body bgcolor="Plum">
<h1><font color="blue">Electronics and Communication Engineering</font></h1>
<h2>
<ol type="I">
<li>Theory of Machines</li>
<li>Automation and Robotics</li>
<li>Engineering Fluid Mechanics</li>
</ol>
</h2>
</body>
</html>
catalogue.html:
<html>
<head>
<title> Catalogue </title>
</head>
<body bgcolor="pink">
<form action="order.html">
<table border="1" width="100%">
<tr>
<td>
<img src="images/wt.jpg" width=100 height=100/>
</td>
<td> Book: Web Technologies <br> Author: Uttam K. Roy <br> Publication:Oxford
University Press</td> <td>531 </td>
<td> <input type="submit" value="Add to cart"/></td> </tr>
<tr>
<td> <img src="images/php.jpg" width=100 height=100/></td>
<td> Book: PHP & MySQL Web Development <br> Author:Luke Welling & Laura
Thompson <br> Publication:PEARSON</td> <td> 898 </td>
<td> <input type="submit" value="Add to cart"/></td> </tr>
</table> </form>
</body> </html>

login.html:
<html>
<body bg color="pink">
<basefont face="Cambria" size="4"> <br>
<center>
<img src="images/login.jpg" width="385" height="135" /><br />
<font face="Brush Script MT" size="7" color="purple">
<b>Enter Login Details:</b>
</font>
</center>
<form name="f1" method="post" action="right.html">
<table align="center" width="100" height="150" cellspacing=”15”>
<tr><td><b>Login ID:</b></td>
<td><input type="text" name="t1"></td>
</tr>
<tr>
<td><b>Password:</b></td>
<td><input type="password" name="t2"></td>
</tr>
<tr align="center">
<td><input type="submit" name="b1" value="Submit"></td>
<td><input type="reset" name="b2" value="Reset"></td>
</tr>
</table> </form> </basefont> </body> </html>
registration.html:
<html>
<head><title>Registration Form</title></head>
<body bgcolor="#E4F0F8">
<center><font color="blue" size="6" face="arial">Registration Form</font></center><br />
<form action="right.html">
First Name(Minimum 6 characters)<font color="red">* </font>
<input type='text' id='firstname' /><br /><br />
Last Name<font color="red"><font color="red">* </font> </font>
<input type='text' id='lastname' /><br /><br />
EmailAddress<font color="red">* </font>
<input type='text' id='email' /><br />
<font color="red">(one e-mail id only):</font>
<font color="redblue">e.g. [email protected]</font><br /><br/>
Password(minimum 6 characters)<font color="red">* </font>
<input type='password' id='pass'><br /><br/>
Address<font color="red">* </font>
<textarea rows="2" cols="20" id='addr' /></textarea> <br /> <br/>
Mobile No<font color="red">* </font>
<input type='text' id='mobileno' /><br />
Gender: <input type='radio' name="gender">male
<input type='radio' name="gender">female<br/><br />
<input type='Submit' value='submit' />
<input type='Reset' value='reset' />
</form> </body> </html>

order.html:
<html>
<head><title>order conformation</title></head>
<body bgcolor="cyan">
<center>
<pre><strong>
<b>Your order Is Conformed
</strong></pre>
<h2><b>THANK YOU...Visit Again</h2>
</center>
</body>
</html>
OUTPUT:


WEEK 2:
Design an XML document to store information about a student in an engineering college
affiliated to JNTU.
.xml
<?xml version="1.0" encoding="UTF-8"?>
<?xml-stylesheet type="text/css" href="PROG5.css"?>
<STUDENTDATA>
<STUDENT>
<USN>USN : 3GN16CS002</USN>
<NAME>NAME : ABHISHEK MALI</NAME>
<COLLEGE>COLLEGE : GNDECB</COLLEGE>
<BRANCH>BRANCH :CSE</BRANCH>
<YEAR>YEAR : 2019</YEAR>
<EMAIL>E-MAIL : [email protected]om</EMAIL>
</STUDENT>
<STUDENT>
<USN>USN : 3GN16CS029</USN>
<NAME>NAME : KESHAV POLA</NAME>
<COLLEGE>COLLEGE : GNDECB</COLLEGE>
<BRANCH>BRANCH :CSE</BRANCH>
<YEAR>YEAR : 2019</YEAR>
<EMAIL>E-MAIL : [email protected]om</EMAIL>
</STUDENT>
<STUDENT>
<USN>USN : 3GN16CS027</USN>
<NAME>NAME : KARAN DANGE</NAME>
<COLLEGE>COLLEGE : GNDECB</COLLEGE>

<BRANCH>BRANCH :CSE</BRANCH>
<YEAR>YEAR : 2019</YEAR>
<EMAIL>E-MAIL : [email protected]</EMAIL>
</STUDENT>
</STUDENTDATA>
prog5.css
*{
display: block; font-size: 20px;
}
USN {
color: blue;
font-size: 30px;
margin-top: 20px;
}
OUTPUT:
USN : 3GN16CS002
NAME : ABHISHEK MALI
COLLEGE : GNDECB
BRANCH: CSE
YEAR: 2019
E-MAIL :abhishek@gmail.com
USN : 3GN16CS029
NAME : KESHAV POLA
COLLEGE : GNDECB
BRANCH: CSE

YEAR: 2019
E-MAIL :keshav@gmail.com
USN : 3GN16CS026
NAME : KIRAN
COLLEGE : GNDECB
BRANCH: CSE
YEAR: 2019
E-MAIL :kiran@gmail.com

WEEK 3: JDBC:
A. Write a program to select a query using JDBC.
B. Write a program to update customer information using JDBC.
WEEK 3:
a.Write a program to select a query using JDBC.
DBExample.java
import java.io.*;
import javax.servlet.*;
import javax.servlet.http.*;
import java.util.*;
import java.sql.*;
public class DBExample extends HttpServlet{
public void doGet(HttpServletRequest request,
HttpServletResponse response)
throws ServletException, IOException
{
String JDBC_DRIVER="com.mysql.jdbc.Driver";
String DB_URL="jdbc:mysql://localhost/csec";
String USER = "root";
String PASS = "TIGER";
response.setContentType("text/html");
PrintWriter out = response.getWriter();
out.println("<html><body><h1>Welcome to MRCET</h1>\n") ;
try{
Class.forName("com.mysql.jdbc.Driver");
Connection conn = DriverManager.getConnection(DB_URL,
USER, PASS);
Statement stmt = conn.createStatement();
String sql;
sql = "SELECT * FROM Emp";
ResultSetrs = stmt.executeQuery(sql);
while(rs.next()){
out.println("ID: " + rs.getString(1));

out.println("Age: " + rs.getString(2));
out.println("First Name: " + rs.getString(3)+"<br>");
}
rs.close();
stmt.close();
conn.close();
}catch(SQLException se){
out.println(se.getMessage());
}catch(Exception e){
out.println(e.getMessage());
}
out.println("</body></html>");
}
}
web.xml:
<?xml version="1.0" encoding="UTF-8"?>
<web-app>
<servlet>
<servlet-name>DBExample</servlet-name>
<servlet-class>DBExample</servlet-class>
</servlet>
<servlet-mapping>
<servlet-name>DBExample</servlet-name>
<url-pattern>/db</url-pattern>
</servlet-mapping>
</web-app>
Output:


WEEK 3:
b.Write a program to update customer information using JDBC.
Jdexample2.html:
<!DOCTYPE html>
<html>
<head>
<title>Insert Data</title>
</head>
<body>
<!-- Give Servlet reference to the form as an instances
GET and POST services can be according to the problem statement-->
<form action="./InsertData" method="post">
<p>ID:</p>
<!-- Create an element with mandatory name attribute,
so that data can be transfer to the servlet using getParameter() -->
<input type="text" name="id"/>
<br/>
<p>String:</p>
<input type="text" name="string"/>
<br/><br/><br/>
<input type="submit"/>
</form>
</body>
</html>
Java1.java:
import java.sql.Connection;
import java.sql.DriverManager;
import java.sql.SQLException;
// This class can be used to initialize the database connection
public class DatabaseConnection {

protected static Connection initializeDatabase()
throws SQLException, ClassNotFoundException
{
String dbDriver = "com.mysql.jdbc.Driver";
String dbURL = "jdbc:mysql:// localhost:3306/";
String dbName = "demoprj";
String dbUsername = "root";
String dbPassword = "root";
Class.forName(dbDriver);
Connection con =DriverManager.getConnection(dbURL+dbNam,dbUsername,dbPassword);
return con;
}
}
Java2.java:
import java.io.IOException;
import java.io.PrintWriter;
import java.sql.Connection;
import java.sql.PreparedStatement;
import javax.servlet.ServletException;
import javax.servlet.annotation.WebServlet;
import javax.servlet.http.HttpServlet;
import javax.servlet.http.HttpServletRequest;
import javax.servlet.http.HttpServletResponse;
// Import Database Connection Class file
import code.DatabaseConnection;
@WebServlet("/InsertData")
public class InsertData extends HttpServlet {
private static final long serialVersionUID = 1L;
protected void doPost(HttpServletRequestrequest,HttpServletResponse response) throws
ServletException, IOException
{
try {

String jdbcUrl = "jdbc:mysql://localhost:3306/BORAJI";
String username = "root";
String password = "admin";
String sql = "update customer set name='Michael Sam' where cus_id=1";
try (Connection conn = DriverManager.getConnection(jdbcUrl, username, password);
Statement stmt = conn.createStatement();) {
stmt.executeUpdate(sql);
System.out.println("Database updated successfully ");
PrintWriter out = response.getWriter();
out.println("<html><body><b>Successfully Inserted"
+ "</b></body></html>");
}
catch (Exception e) {
e.printStackTrace();
}
}
}
OUTPUT:


WEEK: 4 SERVLETS:
c. Write a program to generate a plain text.
d. Write a program to display cookie id.
WEEK 4:
A. Implement the following web applications using servlets USING
SERVLET
Session1.html
<html>
<head><title> SESSION LOGIN </title></head>
<body>
<center>
<form action="http://localhost:8080/Session1/session6vib" method="get">
Enter Name: <input type="text" name="uname"><br>
<input type="submit" value="LOGIN" name="register">
</form>
</center>
</body>
</html>
Session1.java
import javax.servlet.*;
import javax.servlet.http.*;
import java.io.*;
import java.util.*;
public class Session1 extends HttpServlet
{
public void doGet(HttpServletRequestreq, HttpServletResponse res) throwsIOException,
ServletException
{
try
{
res.setContentType("text/html");
PrintWriter out=res.getWriter();
out.println("<form method=get action=session26vib>");
Date d=new Date();
out.println("<p align=right> Time:"+d.getTime()+"</p>");
String un=req.getParameter("uname");
HttpSession session=req.getSession();
session.setAttribute("user",un);
session.setAttribute("time",d.getTime());
out.println("Hello\t"+un);
out.println("<br><br><input type=submit value=logout>");
out.println("</form");

}
catch(Exception e)
{
e.printStackTrace(); } } }
web.xml
<?xml version="1.0"?>
<web-app>
<servlet>
<servlet-name>session1</servlet-name>
<servlet-class>Session1</servlet-class>
</servlet>
<servlet-mapping>
<servlet-name>session1</servlet-name>
<url-pattern>/session6vib</url-pattern>
</servlet-mapping>
</web-app>
OUTPUT:
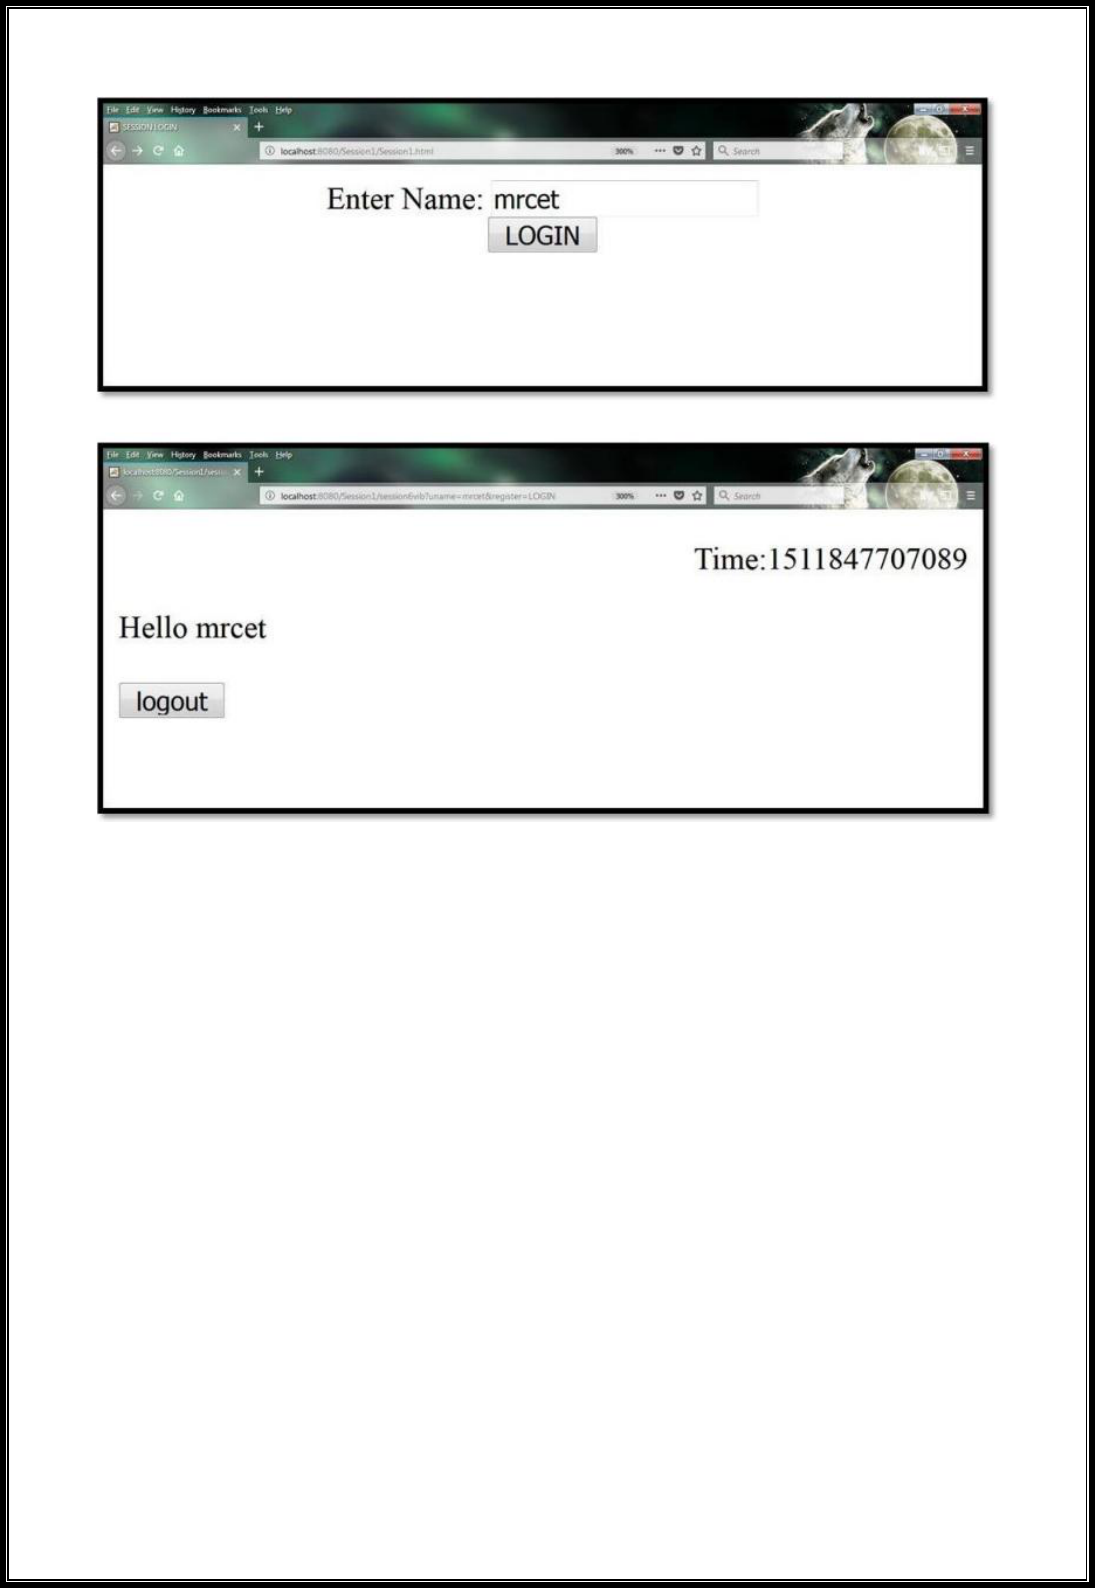
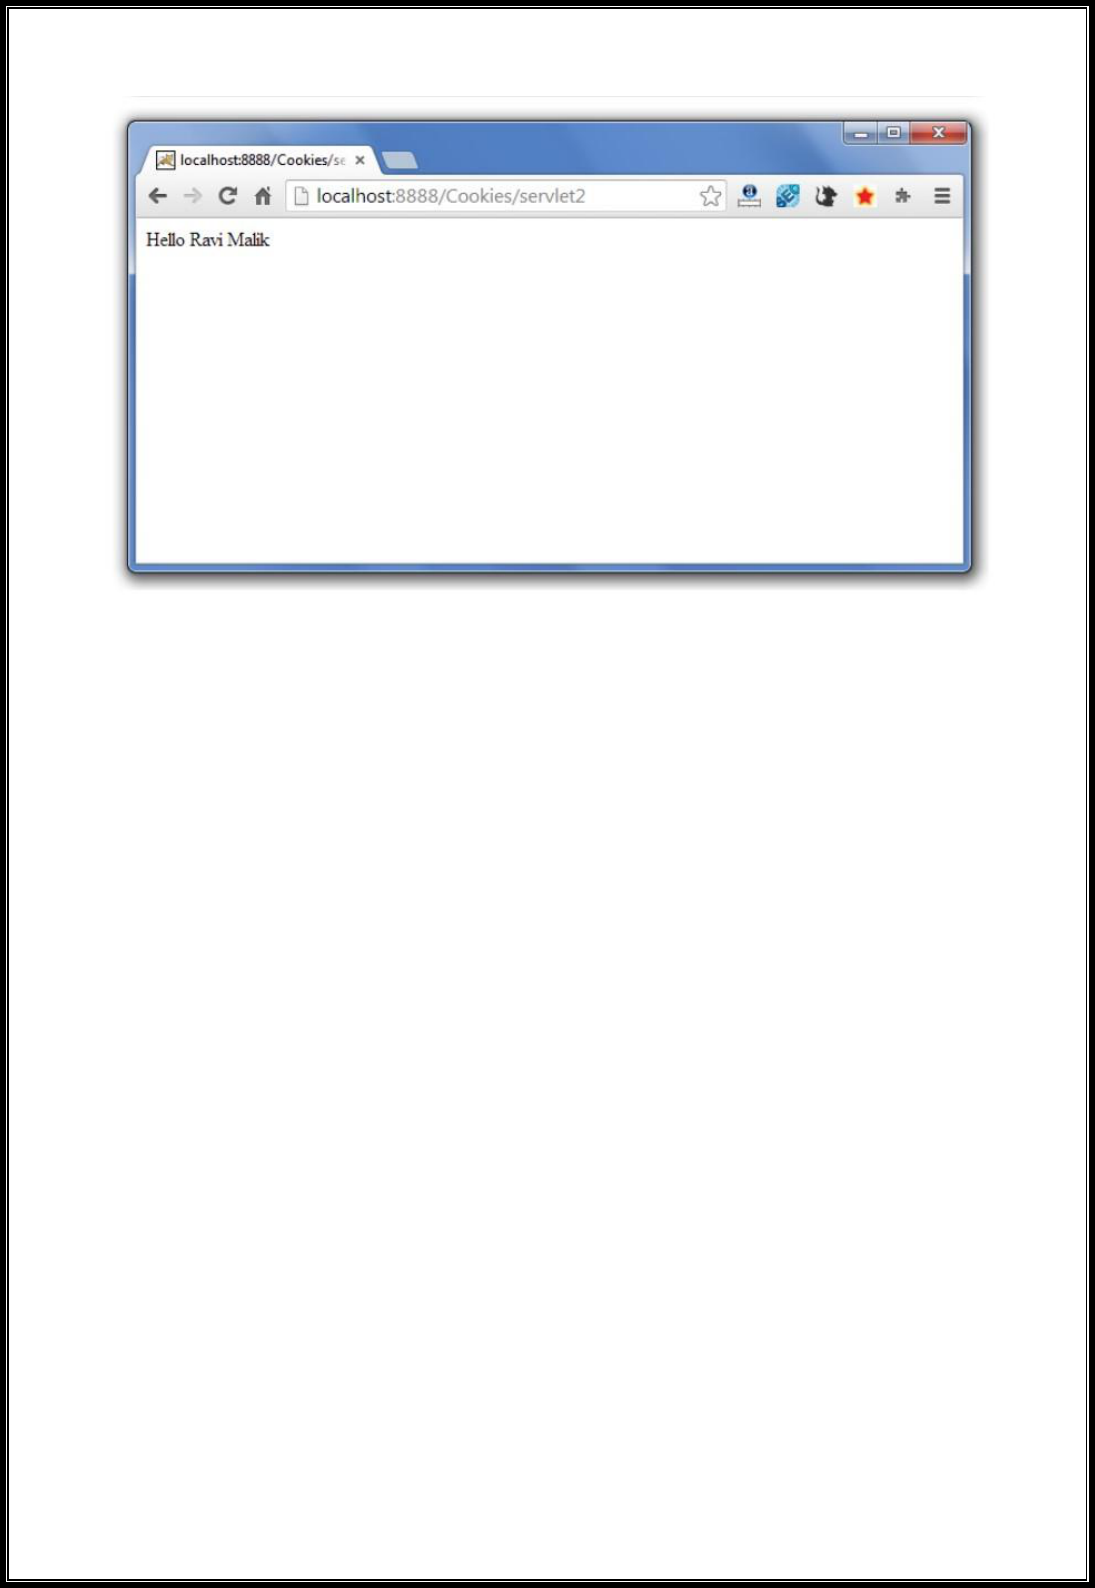
WEEK 4:
b.Write a program to display cookie id.
index.html
<form action="servlet1" method="post">
Name:<input type="text" name="userName"/><br/>
<input type="submit" value="go"/>
</form>
FirstServlet.java
import java.io.*;
import javax.servlet.*;
import javax.servlet.http.*;

public class FirstServlet extends HttpServlet {
public void doPost(HttpServletRequest request, HttpServletResponse response){
try{
response.setContentType("text/html");
PrintWriter out = response.getWriter();
String n=request.getParameter("userName");
out.print("Welcome "+n);
Cookie ck=new Cookie("uname",n);//creating cookie object
response.addCookie(ck);//adding cookie in the response
//creating submit button
out.print("<form action='servlet2'>");
out.print("<input type='submit' value='go'>");
out.print("</form>");
out.close();
}catch(Exception e){System.out.println(e);}
}
}
SecondServlet.java
import java.io.*;
import javax.servlet.*;
import javax.servlet.http.*;
public class SecondServlet extends HttpServlet {
public void doPost(HttpServletRequest request, HttpServletResponse response){
try{
response.setContentType("text/html");
PrintWriter out = response.getWriter();
Cookie ck[]=request.getCookies();
out.print("Hello "+ck[0].getValue());
out.close();
}catch(Exception e){System.out.println(e);}
}

}
web.xml
<web-app>
<servlet>
<servlet-name>s1</servlet-name>
<servlet-class>FirstServlet</servlet-class>
</servlet>
<servlet-mapping>
<servlet-name>s1</servlet-name>
<url-pattern>/servlet1</url-pattern>
</servlet-mapping>
<servlet>
<servlet-name>s2</servlet-name>
<servlet-class>SecondServlet</servlet-class>
</servlet>
<servlet-mapping>
<servlet-name>s2</servlet-name>
<url-pattern>/servlet2</url-pattern>
</servlet-mapping>
</web-app>
OUTPUT:


WEEK 5 : JAVA SERVER PAGES:
d. Write a program to represent basic arithmetic functions.
e. Write a program to display a string.
f. Write a program to create check boxes.
WEEK 5:
A. Write a program to represent basic arithmetic functions.
Arithmetic.jsp
<%@page contentType="text/html" pageEncoding="UTF-8"%>
<%@page import="java.util.*;" %>
<!DOCTYPE HTML PUBLIC "-//W3C//DTD HTML 4.01 Transitional//EN"
"http://www.w3.org/TR/html4/loose.dtd">
<!-- save as a Arithmetic.jsp program
contain different arithmetic operation-->
<html>
<head>
<meta http-equiv="Content-Type" content="text/html; charset=UTF-8">
<title>R4R Tech Soft</title>
</head>
<body>
<h1 style="color: green; font-style: inherit">Hello R4R Tech Soft! Arithmetic
Operation</h1>
<!javascript is used for checked the validation>
<script>
function check(){
if(document.Arithmetic.firstDigit.value==null||document.Arithmetic.firstDigit.value=="")
{
alert("Please Enter the value of X:");
return false;
}else
if(document.Arithmetic.secondDigit.value==null||document.Arithmetic.secondDigit.value==
"")
{

alert("Please Enter the value of Y:");
return false;
}
else{document.Arithmetic.submit();}
}
</script>
<form action="#" name="Arithmetic">
<BR>Enter the first digit: X
<input type="text" name="firstDigit" value="" size="20" >
<BR><BR>Enter the second digit: Y
<input type="text" name="secondDigit" value="" size="20" >
<BR><BR>
<input type="submit" value=" submit"name="submit" onclick="check()">
</form>
<%
if (request.getParameter("submit") != null) {
//Take the value of x & y and Type Conversion
String s = (String) request.getParameter("firstDigit");
int x = Integer.parseInt(s);
String s1 = (String) request.getParameter("secondDigit");
int y = Integer.parseInt(s1);
//Arithmetic operation
int Sum = x + y;
{
out.println("<BR>Additon of X and Y = " + Sum);
int Substraction = x - y;
out.println("<BR>Substraction of X and Y + Substraction);
float Division = x / y;
out.println(" <BR>Division of X and Y = "+ Division);
int Mulitplication = x * y;
out.println("<BR>Mulitplication of X and Y = " + Mulitplication);
out.print("<br/>");
}
out.print("<BR>");

for (int i = 0; i<= x; i++) {
if ((i % 2) == 0) {
out.print(" Even number of X : " + i);
out.print("<br>");
}
}
out.print("<BR>");
for (int i = 0; i<= x; i++) {
if ((i % 2) != 0) {
out.print(" Odd number of X :" + i);
out.print("<br>");
}
}
}
OUTPUT:

WEEK 5:
b.Write a program to display a string.
create.jsp
<HTML>
<HEAD>
<TITLE>Creating a String In JSP</TITLE>
</HEAD>
<BODY BGCOLOR="cyan">
<H1>Creating a String In JSP</H1>
<%
String greeting = "Hello from JSP String!";
out.println(greeting);
%>
</BODY>
</HTML>

OUTPUT:

WEEK 5:
C. Write a program to create check boxes.
<%@ page language="java" contentType="text/html; charset=ISO-8859-1"
pageEncoding="ISO-8859-1"%>
<!DOCTYPE html PUBLIC "-//W3C//DTD HTML 4.01 Transitional//EN"
"http://www.w3.org/TR/html4/loose.dtd">
<html>
<head>
<meta http-eqUIv="Content-Type" content="text/html; charset=ISO-8859-1">
<script type="text/javascript">
function demo()
{
for(var i=0; i< document.form1.subject.length; i++)
{
if(!document.f.subject[i].checked)
{
alert("Please Select Your options");
return false;
}
else
{
alert("Click Submit to Know your choices");
return true;
}
}
}
</script>
<title>Sample</title>
</head>
<body>
<form name="f" onsubmit="demo()">
<h3>Please Select your Choices</h3>

<p><input type="checkbox" name="subject" value="first"/>first</p>
<p><input type="checkbox" name="subject" value="second"/>second</p>
<p><input type="checkbox" name="subject" value="third"/>third</p>
<p><input type="checkbox" name="subject" value="fourth"/>fourth</p>
<p><input type="checkbox" name="subject" value="fifth"/>fifth</p>
<p><input type="submit" value="submit" />
</form>
<%
String subject[]= request.getParameterValues("subject");
if(subject != null)
{
%>
<h4>You selected options </h4>
<ul>
<%
for(int i=0; i<subject.length; i++)
{
%>
<li><%=subject[i]%></li>
<%
}
%>
</ul>
<%
}
%>
</body>
</html>
OUTPUT:

WEEK 6:
JAVA BEANS:
a. Write a program to generate plain text.
b. Write a simple web-based Hello World application using Spring MVC framework.
c. Write a simple web-based Hello World application using Spring Django
framework
a. Write a program to generate plain text.
//Student.java
// Java Program of JavaBean class
package mrcetjavabean;
public class Student implements java.io.Serializable
{
private int id;
private String name;
public Student()
{
}

public void setId(int id)
{
this.id = id;
}
public int getId()
{
return id;
}
public void setName(String name)
{
this.name = name;
}
public String getName()
{
return name;
}
}
//Test.java
// Java program to access JavaBean class
package mrcetjavabean;
public class Test {
public static void main(String args[])
{
Student s = new Student(); // object is created
s.setName("MRCET-IT"); // setting value to the object
System.out.println(s.getName());
}
}

B.Write a simple web-based Hello World application using Spring MVC framework.
//HelloController.java
package mrcetsprings;
import org.springframework.stereotype.Controller;
import org.springframework.web.bind.annotation.RequestMapping;
import org.springframework.web.bind.annotation.RequestMethod;
import org.springframework.ui.ModelMap;
@Controller
@RequestMapping("/hello")
public class HelloController {
@RequestMapping(method = RequestMethod.GET)public String printHello(ModelMap
model) {
model.addAttribute("message", "Hello Spring MVC Framework!");
return "hello";
}
}
// The content of Spring Web configuration file web.xml
<web-app id = "WebApp_ID" version = "2.4"
xmlns = "http://java.sun.com/xml/ns/j2ee"
xmlns:xsi = "http://www.w3.org/2001/XMLSchema-instance"
xsi:schemaLocation = "http://java.sun.com/xml/ns/j2ee
http://java.sun.com/xml/ns/j2ee/web-app_2_4.xsd">
<display-name>Spring MVC Application</display-name>
<servlet>
<servlet-name>HelloWeb</servlet-name>
<servlet-class>
org.springframework.web.servlet.DispatcherServlet
</servlet-class>
<load-on-startup>1</load-on-startup>

</servlet>
<servlet-mapping>
<servlet-name>HelloWeb</servlet-name>
<url-pattern>/</url-pattern>
</servlet-mapping>
</web-app>
//The content of another Spring Web configuration file HelloWeb-servlet.xml
<beans xmlns = "http://www.springframework.org/schema/beans"
xmlns:context = "http://www.springframework.org/schema/context"
xmlns:xsi = "http://www.w3.org/2001/XMLSchema-instance"
xsi:schemaLocation = "http://www.springframework.org/schema/beans
http://www.springframework.org/schema/beans/spring-beans-3.0.xsd
http://www.springframework.org/schema/context
http://www.springframework.org/schema/context/spring-context-3.0.xsd">
<context:component-scan base-package = "com.tutorialspoint" />
<bean class = "org.springframework.web.servlet.view.InternalResourceViewResolver">
<property name = "prefix" value = "/WEB-INF/jsp/" />
<property name = "suffix" value = ".jsp" />
</bean>
</beans>
//The content of Spring view file hello.jsp
<%@ page contentType = "text/html; charset = UTF-8" %>
<html>
<head>
<title>Hello World</title>
</head>
<body>
<h2>${message}</h2>
</body>
</html>

OUTPUT:
C. Write a simple web-based Hello World application using Spring Django framework
Initial Set Up
To begin, open up a new command line shell or use the built-in terminal on VS Code. For the
latter click on “Terminal” at the top and then “New Terminal” to bring it up on the bottom
of the screen. Make sure you are not in an existing virtual environment by checking there is
nothing in parentheses before your command line prompt. You can even type deactivate to
be completely sure. Then navigate to the code directory on your Desktop and create
a helloworld directory with the following commands.
# Windows
> cd onedrive\desktop\code
> mkdir helloworld
> cd helloworld
# macOS
% cd ~/desktop/code
% mkdir helloworld
% cd helloworld
Create a new virtual environment called .venv, activate it, and install Django with Pip as
we did in the previous chapter.

# Windows
> python -m venv .venv
> .venv\Scripts\Activate.ps1
(.venv) > python -m pip install django~=4.0.0
# macOS
% python3 -m venv .venv
% source .venv/bin/activate
(.venv) % python3 -m pip install django~=4.0.0
Now we’ll use the Django startproject command to make a new project
called django_project. Don’t forget to include the period (.) at the end of the command so
that it is installed in our current directory.
(.venv) > django-admin startproject django_project .
Let’s pause for a moment to examine the default project structure Django has provided for
us. You examine this visually if you like by opening the new directory with your mouse on
the Desktop. The .venv directory may not be initially visible because it is “hidden” but
nonetheless still there.
├── django_project
│ ├── __init__.py
| ├── asgi.py
│ ├── settings.py
│ ├── urls.py
│ └── wsgi.py
├── manage.py
└── .venv/
The .venv directory was created with our virtual environment but Django has added
a django_project directory and a manage.py file. Within django_project are five new files:
__init__.py indicates that the files in the folder are part of a Python package.
Without this file, we cannot import files from another directory which we will be
doing a lot of in Django!
asgi.py allows for an optional Asynchronous Server Gateway Interface to be run
settings.py controls our Django project’s overall settings
urls.py tells Django which pages to build in response to a browser or URL request

wsgi.py stands for Web Server Gateway Interface which helps Django serve our
eventual web pages.
The manage.py file is not part of django_project but is used to execute various Django
commands such as running the local web server or creating a new app.
Let’s try out our new project by using Django’s lightweight built-in web server for local
development purposes. The command we’ll use is runserver which is located in manage.py.
# Windows
(.venv) > python manage.py runserver
# macOS
(.venv) % python3 manage.py runserver
If you visit http://127.0.0.1:8000/ you should see the following image:
Hello, World
In Django, four separate files aligning with this MVT pattern are required to power one
single dynamic (aka linked to a database) webpage:
models.py
views.py
template.html (any HTML file will do)
urls.py

However, to create a static webpage (not linked to a database) we can hardcode the data
into a view so the model is not needed. That’s what we’ll do here to keep things simple.
From Chapter 4 onwards we’ll be using the model in all our projects.
views.py
# pages/views.py
from django.http import HttpResponse
def homePageView(request):
return HttpResponse("Hello, World!")
urls.py
# pages/urls.py
from django.urls import path
from .views import homePageView
# django_project/urls.py
from django.contrib import admin
from django.urls import path, include # new
We have all the code we need now. To confirm everything works as expected, restart our
Django server:
# Windows
(.venv) > python manage.py runserver
# Windows
(.venv) > python manage.py runserver
# macOS
(.venv) % python3 manage.py runserver
urlpatterns = [
path("", homePageView, name="home"),
]

If you refresh the browser for http://127.0.0.1:8000/ it now displays the text “Hello, World!”
OUTPUT:
