
The SONIC Junior Balloonist Plans for
Building a Tissue Paper Hot Air Balloon
Adapted from an Internet article by Brian Queen –
www.cadvision.com/castle/balloons.htm
Illustrations by Brian Queen
Materials
For each balloon you will need the following materials -
Ø Sixteen sheets of tissue paper 20 x 26 inches for the balloon envelope
Ø Two sheets of 22 x 28 inch poster board taped end to end to make a
template. (You could also make the template out of kraft paper.)
Ø A solid glue stick (liquid glue is not recommended)
Ø A 24-inch length of wire for the bottom ring. (Use 18 gauge or smaller wire. A
coat hanger is too heavy for this size balloon.)
To launch the balloons you will need -
Ø An electric popcorn popper, hair dryer, industrial heat gun or camp stove.
Ø If you use a camp stove for your source of heat, you will also need a
stovepipe of at least 24 inches in length and 6 inches in diameter. (A vent
pipe for a gas water heater. Available for about $2 at your local hardware
store.)
Ø A 12 inch length of string to make a loop at the top of the balloon.
Ø A broom handle or stick with a hook on the end to support the balloon while
being filled with hot air.
Assembly
The balloon is assembled from panels called "gores" which are glued together to
form the envelope of the balloon.
Step 1 - Make a template out of the poster board or kraft paper using the "Gore
Template Dimensions" sheet included with this lesson.
Step 2 - Make 8 tissue paper panels, each 48 inches long, by gluing two sheets
of tissue paper together end to end. Use a 3/8-inch overlap for the glue joint.
Step 3 - Stack the eight panels on top of one another and staple them together at
the four corners.
Step 4 - Lay the gore pattern template on top of the panels and trace its outline
onto the stack using a fine felt tip marker.
Step 5 - Using scissors, cut out the pattern through all eight sheets at once.
Save the excess paper for the crown (Step 13) and for future repairs.
Step 6 - Cut an 8-inch diameter circle out of the leftover tissue paper to be used
as the crown.

Step 7 - Take two of the gores and
lay one on top of the other, slightly
offsetting the top gore to one side by
3/8 inch. Apply glue to the lower
panel along the 3/8 inch margin and
fold it over onto the top panel. Glue
and fold immediately as you work
along the length of the panel.
Step 8 - Lay a third panel on top of the two just
glued, but this time offset the panel to the
opposite side (see Figure 3). Glue and fold as
you did the first time creating an accordion
fold. Continue in this manner until you have
glued all eight gores. Check often to see if any
of the panels are being glued in the wrong
place.
Step 9 - Now lift the unglued edge of the top
or eighth panel and fold panels two through
seven in half into the center leaving the
edges of panels one and eight to be glued
together like the rest, completing the circle
(see Figure 4). Check once again that there
are no areas glued that should not be.
Step 10 - Open the mouth of the balloon and
make eight tabs in the neck of the balloon by
cutting one-inch deep cuts between each of
the eight seams (see Figure 5).
Step 11 - Make a hoop from the 24-inch piece of
wire. Size the hoop by opening it inside the neck
of the balloon along the end of the cuts you
made for the tabs. Then fix the size of the wire in
place with
Step 12 - Secure the wire hoop in place by
gluing and folding the tabs over it. The wire hoop
serves two purposes 1) to weigh down the
bottom of the balloon so that it is more stable in
flight and 2) to hold the mouth of the balloon
open making it easier to fill with hot air.
Step 13 - Inflate the balloon using a small fan or hair dryer and repair any
unglued seams or holes. Stand the inflated balloon upright and deflate it by
slowly pushing down on the top.
Step 14 - By deflating in this manner it is easier to glue the crown you made in
Step 6 to the top of the balloon. This crown covers any mismatched gores. It
also reinforces the balloon and helps slow the cooling of the air in the envelope.
Tip - fold the crown in half and then in half again. The creases will cross in the
center of the crown. Glue along the creases and around the perimeter of the
crown then apply it to the center of the top of the deflated balloon.
Step 15 -Tape a small loop of string to the top of the balloon to provide a
handhold while inflating the balloon.
YOUR TISSUE PAPER HOT AIR BALLOON IS NOW READY TO LAUNCH!
Launching
Hot air balloons fly best on still, cool mornings. You must have a large space to
launch your balloon because, like the real thing, it is at the mercy of the wind,
except that there is no one controlling it.
The balloon in these plans rarely goes above the top of houses and usually flies
about 50 yards. This size balloon can also be flown indoors. Larger balloons, like
the 8-foot balloon in Brian Queen's article, can fly for miles. The danger is that it
may come down on a busy street or freeway or get caught in power lines.
Choose an open field and only fly the balloon in very light wind.
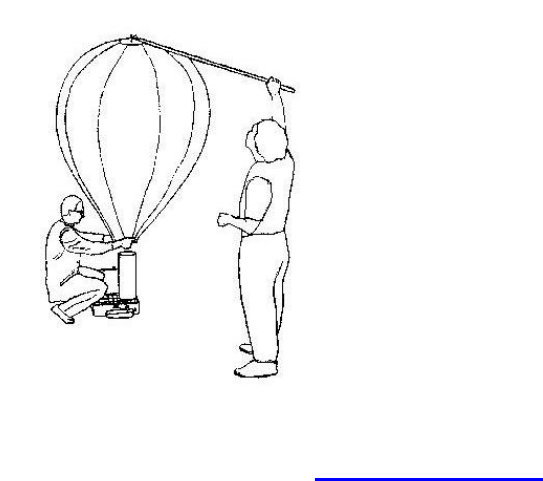
To fill the balloon, support the crown using the loop of kite string. Use a hair dryer
or heat gun to fill the balloon. For even better performance outdoors place a
stovepipe over a lit camp stove and lower the neck of the balloon over the
stovepipe. Wear a pair of leather gloves when using the camp stove. Fill the
balloon with hot air until a distinct upward pull is felt. Then let go and it will quickly
ascend.
For more information about the Sonic Junior Balloonist program contact
Balloon Fest at 405/475-7006 or log on to www.balloonfest.com

GORE TEMPLATE DIMENSIONS
