
Store More Apex Shed
4x6 | 8x6 | 12x6 | 16x6 | 20x6
4x8 | 8x8 | 10x8 | 12x8 | 16x8 | 20x8
Adult assembly only
Minimum 2 people
5 Hours building time based
on size and experience
Made in Great
Britain
Store More Garden Buildings Limited,
Edward Merton House, Park Gate Close, Bredbury Park Way, Bredbury Industrial Park, Stockport, Cheshire. SK6 2SZ
Tel: (0161) 430 3347 Fax: (0161) 406 6054 , E-mail: [email protected] , www.shedbaron.co.uk

Building your Shed And Maintenance Troubleshooting & General Advice
Pre-Building Checklist
● Base - Make Sure you have a flat and level base to build on. More Details below
● Walking Space - You should build your shed 2 feet away from any existing
structures or obstructions (such as fences, tree’s, power lines, etc.) This is to
ensure that you have room to get around and care for your shed, but also to
prevent damage over time. Follow recommended maintenance to prevent
damage over time
● Check your parts - Especially important if you are designating a day to build or
hiring a handyman. Check you have all your parts before starting assembly, or
hiring any 3rd party to assemble your building.
Bases
● We recommend you build your shed on a flat, level base with good water
drainage. We would advise checking that no rain pools on your base before you
assemble anything.
● Any level
material,
such as
flagstones
or concrete
is ideal
Recommended Maintenance
● Use a silicone sealant inside & outside of the windows as soon as possible after
assembly to prevent leaks.
● Treat your building after construction & annually with a good quality water
resistant treatment. Follow instructions on your treatment. Take care to cover
all exposed timber, particularly with clear coat treatments
● Trim any overhanging trees or branches. These could peirce windows or felt
and lead to leaking.
● Regularly Check & Replace Damaged Felt to prevent water ingress.
● Use a suitable oil to lubricate any moving parts, such as hinges
Troubleshooting
● Q: I have a missing part. What should I do? A: Firstly check that all of your
building’s parts are there by laying them all out on the ground. Check between
the panels & larger parts as glazing comes banded together & is placed
between the panels, along with the fixing kit, for safer transportation. If they
are still not found please call our support team
● Q: My building seems a little flimsy? A: Your building won’t reach full rigidity
until fully assembled so do not panic.
● Q: Construction seems tricky? A: Take your time & read the instructions
thoroughly. These buildings should be constructed by two people. If in doubt
contact our team for advice.
● Q: My building isn’t going together properly, it is twisted. A: This a common side
effect of an uneven base. Check that your base is level and inspect the panels
are positioned correctly. If still in doubt, contact our team for assistance.
● Q: Why is there a gap around the doors? A: During the year the wood of your
building will shrink & expand, which will create a gap around you building’s
doors. This is natural.
● Q: My building is not water tight around the windows. A: These products have
been designed as an affordable solution to most popular light domestic uses &
we do not state that they are watertight. Use silicon sealant around the
windows to improve the water resistant qualities of the building.
General Advice
● Wood is a natural material, which means that no two boards on your building
will be identical & will expand & contract differently due to moisture levels.
This natural effect of expansion or contraction is inevitable and is compensated
for by the tongues and grooves of the boards or overlap between boards.
Timber in overlap buildings may warp & twist over time, which is a natural
process. The timber may crack naturally over time, but will not affect the
structural integrity of the building provided it has been assembled as advised.
● Please watch out for the following minor blemishes:
- Protruding nails = hammer in the nails so that they are flush with the
wood’s surface.
- Splintered wood and sharp edges = smooth down with sandpaper.
Wear protective gloves & robust clothes during construction to
prevent splinters.
- Loose or dead knots, cracks = use a non-toxic wood glue to secure.
- Some boards have a rough side and a smoother side. Ensure that these
are placed appropriately, i.e. floorboards are smooth side up

All 4ft Panels are interchangeable with one another to fully
configure your own building
Use the diagrams to plan your buildings layout before you
begin building. Choose a layout for the sides, then select
which panel you would like in each slot
Types of 4ft Panels:
Building Planner - 8x6
Door Panel
Make sure this
Door Panel has
plenty of room
around it to open
your door outwards
so your shed is easy
to access.
Plain Panel
This Plain Panel is
great for protecting
against the
elements and
perfect for being
placed against a
wall, fence or
hedge.
Window
Panel
The Window Panel
means your shed
will be filled with
plenty of natural
light. Use the
modular design to
place this wherever
it will get the most
light each day
4ft Plain / Door / Window
2ft Plain

Building Planner - 12x6
Building Planner - 16x6
4ft Plain / Door / Window
2ft Plain
4ft Plain / Door / Window
2ft Plain

Building Planner - 20x6 Building Planner - 4x6
Building Planner - 4x8
Plain / Door / Window
4ft Plain / Door / Window
2ft Plain
4ft Plain / Door / Window
2ft Plain

Building Planner - 8x8 Building Planner - 10x8
4ft Plain / Door / Window
2ft Plain
4ft Plain / Door / Window
2ft Plain
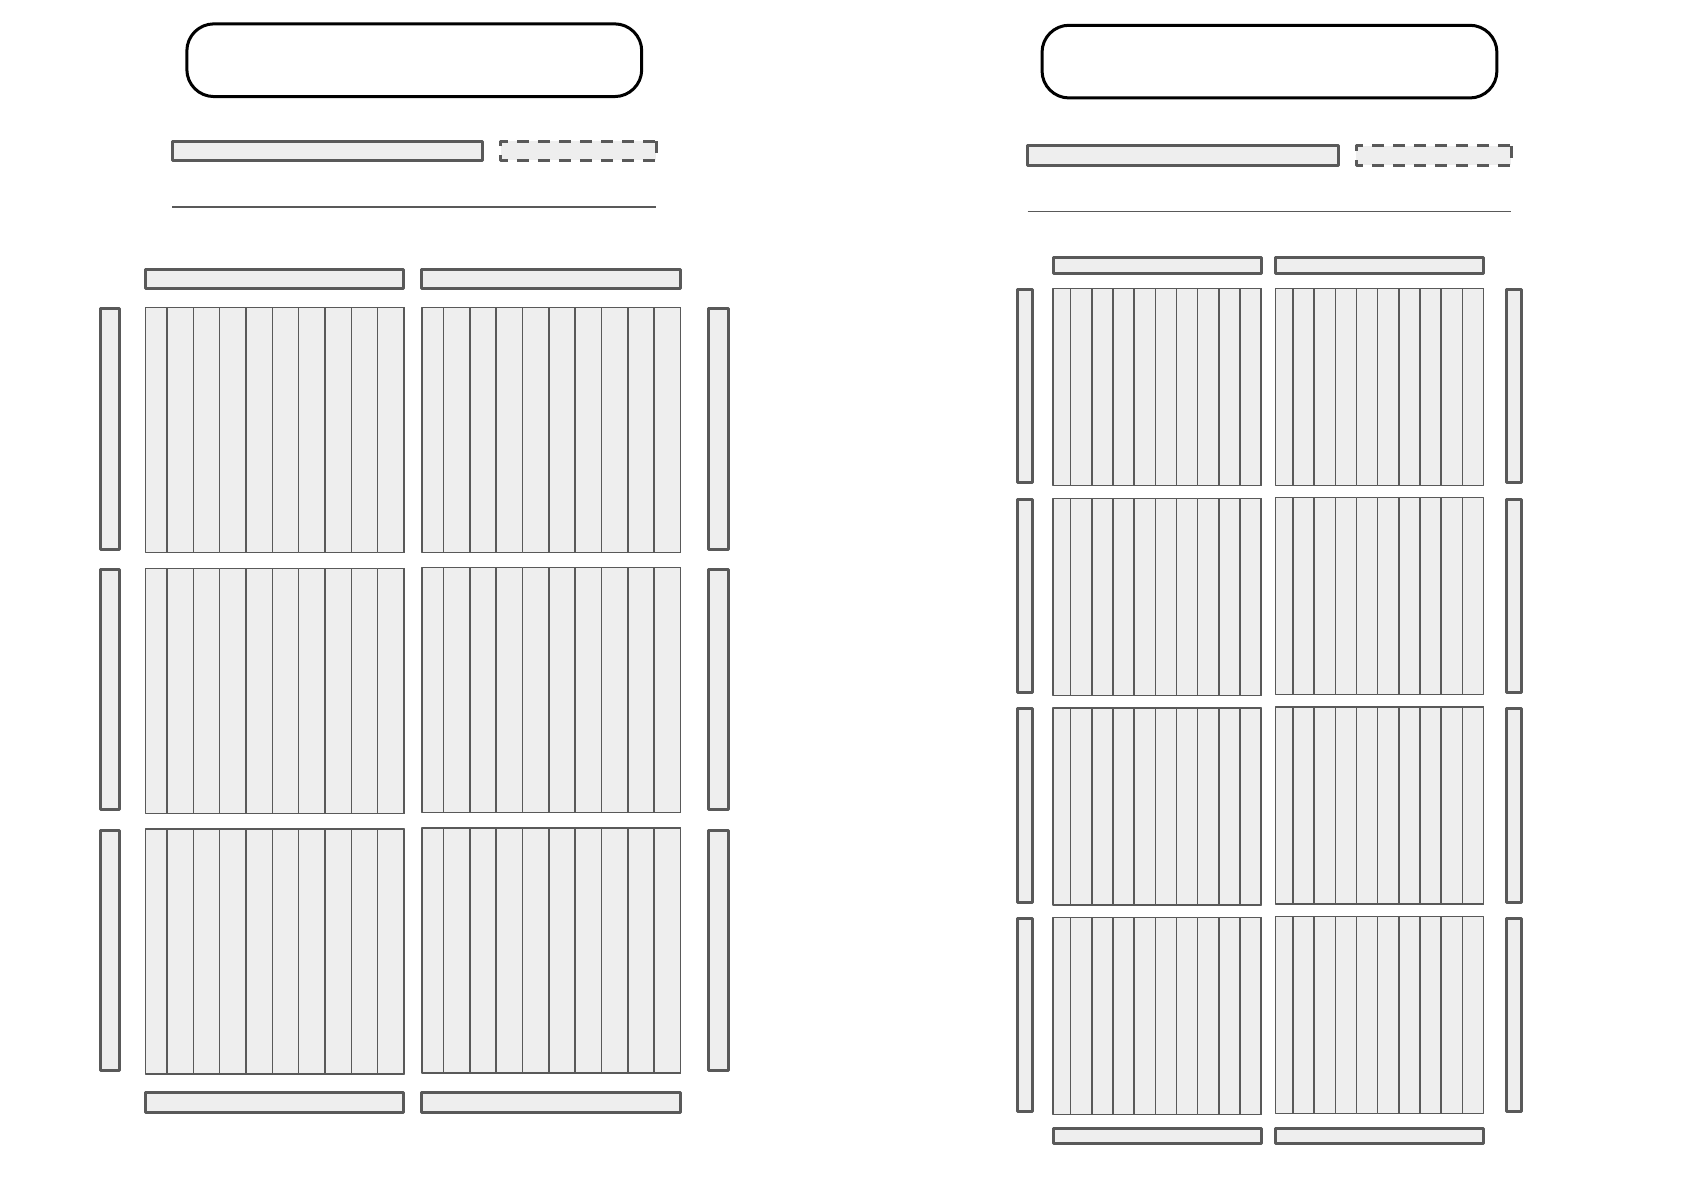
Building Planner - 12x8 Building Planner - 16x8
4ft Plain / Door / Window
2ft Plain
4ft Plain / Door / Window
2ft Plain

Building Planner - 20x8
4ft Plain / Door / Window
2ft Plain
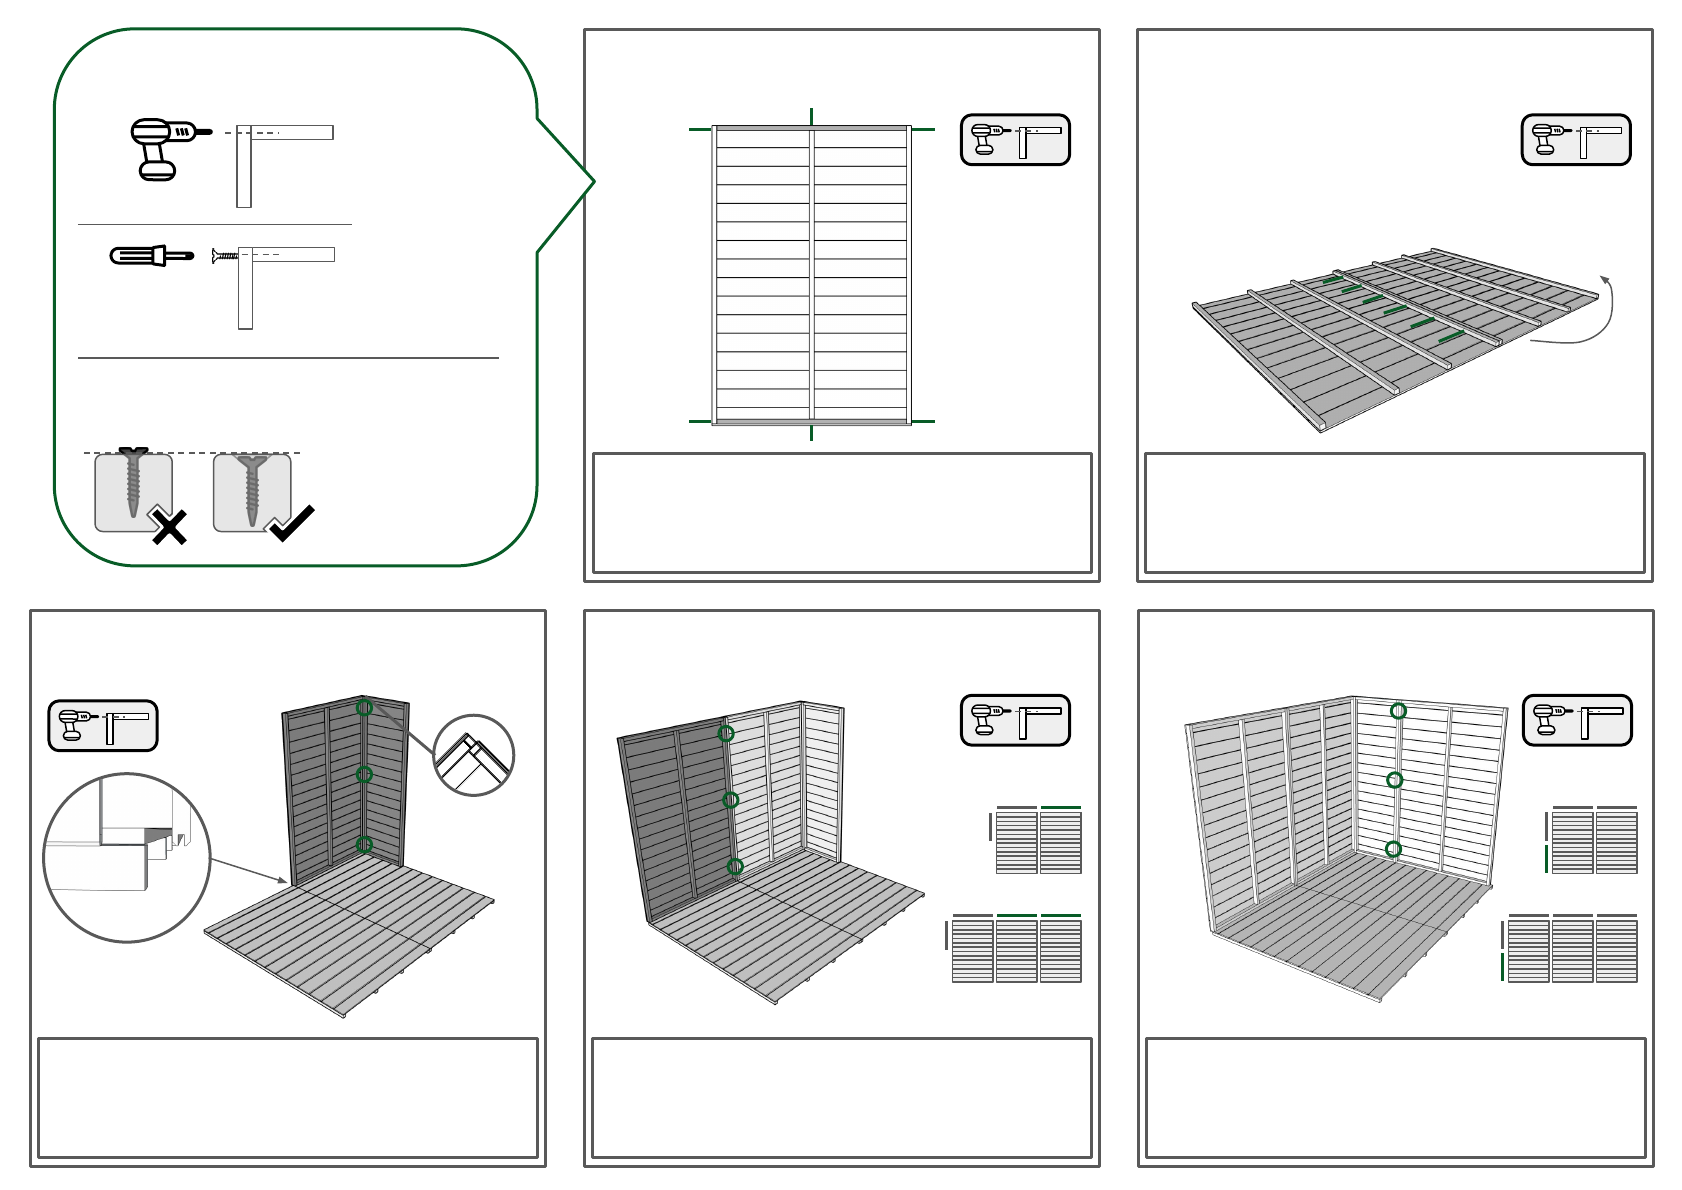
Step
01
Firstly install the top & bottom rails to each of your wall
panels. The length and/or quantity may vary based on
the panel. Affix these as shown, using 50mm Screws.
Pilot drill all screw holes to avoid splitting.
Step
03
Step
05
Use 3x50mm Screws to affix the next side panel. As all
4ft panels are interchangeable your design may vary
here. Follow your building planner to see which panel
should sit her (2ft / 4ft).
Step
04
Use 3x50mm Screws to affix the next back panel.
Follow your building planner to install all panels for this
wall. Once again, all 4ft panels are interchangeable, so
your design may vary here.
Step
02
Next join together your floor sections as shown in your
building planner. Use 50mm Screws to join. If you have an 8ft
deep building, you will need to connect the front and back
sections using the floor blocks. Flip the floor over to continue.
For safety, only flip up to 4 floor sections at once.
8x6
12x6
8x6
12x6
Next, install the back 2 corner panels. These will vary based
on your choice of positions. The panel (2ft / 4ft) along the side
wall will sit in front of the back panel (2ft / 4ft). Use 3x 50mm
Screws. There will be a 17mm gap between the cladding of the
side panel and the floor.
Pilot Drilling Holes
Pilot drill
all screw
holes to
avoid
wood
splitting.
Countersinking Screws
Countersink
all screws to
avoid sharp
edges

Step
06
Now, affix the other side panels. These should be a 2ft &
4ft panel for a 6ft deep building. For an 8ft deep
building, this will be 2x 4ft Panels. Affix together, & to
the back right wall using 50mm Screws as shown.
Step
08
Now the walls are completed you can fix your panels to
the floor. Using 50mm screws, fix each panel to a
bearer, through the floorboards (the nails down the
center of each floor section will help as a guide).
Step
09
Fix the side gable panels to the side wall framing with
50mm screws, as shown. This will line up with the front
of the panel, not the front of the building. Repeat this
step on both sides of the building.
Step
11
Now fix the truss in place on top of the wall panels. Affix
into the blocks using 70mm Screws. Make sure to line
the middle of the truss up where the panels meet. Fix
the purlins using 30mm screws.
Step
10
Build the truss by lining up the angled beams alongside
the angled wooden boards use 30mm screws to secure
in place.
Step
07
In order to finish the 4 walls, fix the front 2 panels in
place, using 50mm Screws at each join. The front panels
will sit in front of the side panels. (12x6 will have 3
panels, 16x6 will have 4, etc.)
8x6
12x6
8x6
12x6

Step
12
To begin installing your roof, first attach a roof board
flush with the front face of your building, as shown. Fix
in place using 2x 30mm Nails at either end & one nail in
the center.
Step
14
Repeat Steps 12-13 on the other side of the roof. Note,
if you have a 12x6 Building, you will need to install the
central roof boards first, then the opposite side boards.
Step
15
To fix the windows in place, position the included sills
along the bottom edge of each window, as shown. This
will be held in place with the glazing in the next step. (If
your building has no windows, skip to 18).
Step
17
Using 30mm Nails, fix the cover stips in place to hold
each of the glazing sections in place. Take care not to
pierce the glazing itself with the nails. Repeat steps
15-17 until all the glazing sheets are held in place.
Step
16
As mentioned, the glazing should be placed in front of
each sill, to hold it in place. Fit your windows centrally
within each opening in order to leave some room
left/right to fix the cover strips.
Step
13
Continue to place & fix roof boards until there is an
overhang at the back. Use 2 Nails at either side.

Step
18
Next, affix the hinges to your doors. These should be
attached in line with the framing on the back of the
doors. Use 4x 30mm Screws per hinge. Next, fix the
door framing as shown, using 30mm screws.
Step
20
Fix the cloaking strip up the center using 30mm Nails
into the framing behind the door. Affix to the side you
want to be the main door. On the same side, affix the
latch to the top of the frame using a 25mm Screw
Step
21
Inside, on the opposite door, fix the 2 door blocks from
the outside using 2x 50mm Screws each. Next use a
25mm Screw to affix the latches, top & bottom
Step
23
Cut your felt to the length of your roof + 140mm. For
this building you will have 3 lengths of felt. Affix the first
length using felt tacks at 100mm intervals along the
dotted line. Use 5 more at the top.
Step
22
To begin fixing the included felt to your building, first
affix the eaves to the back of your building, where the
roof overhangs. Use 3x 30mm Screws for each. Ensure
these are flush left & right of the roof boards.
Step
19
Now fix the doors in place by attaching the hinges to
either side of the door frame. To ensure easy access to
the building, allow for a 2mm gap at either side & a 4mm
gap in the center
2mm
4mm

Step
24
Next fold the sides of this sheet over the edge of your
building and fix down using felt tacks.
Step
26
Affix the 3rd sheet this should overlap both of the side
sheets. At 100mm intervals secure with felt tacks along
the dotted lines. Fold and fix down the sides using tacks
also.
Step
27
Install the Fascia Boards over the top of the Felt to
finish and secure using 30mm nails as shown. This will
also secure any felt that may be resisting being folded
or tacked in place.
Step
29
Congratulations! Your Garden Building is now
complete. To ensure your building lasts for years to
come, retreat annually to prevent damage. Please do
not treat for the first 6 months.
Step
28
Add cloaking strips along any seams in the building to
complete the walls of your building. You will need to cut
some of these to length. Also add the decorative
diamond to cover the facia split line.
Step
25
Repeat steps 23-24 to add the other side. Fix at 100mm
intervals along the dotted line. Use 5 Tacks at the top
and fold the sides down over the edge of the building
and affix with Tacks.

Thank you for purchasing this Store More
product, we hope you will be delighted with
your new building for years to come, and if you
are we’d love for you to leave a review!
If for whatever reason you are not satisfied with
your purchase, you have any queries or you need
any help, call our Product Support Team on
0161 430 3347
shedbaron.co.uk 0161 430 3347
After Market Modification
● We do not recommend modifying this product. However, customers do enjoy modifying their buildings with their
own specific needs in mind as our products allow for a wide range of uses. If you modify this product for your own
personal requirements you are doing so at your own risk.
● Customers who modify their buildings should ensure they do so safely & ensure they do not affect structural
integrity as we will not be held liable for injuries caused as a result of the modification.
● If you are considering modifying this building be aware that any modifications invalidate your warranty & may
affect your consumer rights.
Product Warranty
● Products are built to the highest quality standards & should provide convenient, secure storage for years to come,
this of course being subject to reasonable use, care & transportation.
● If in doubt about the product’s limitations please read & understand all of the instructions & guidance notes. If
necessary please contact the retailer that the item was purchased from.
● Please contact the retailer from which the product was purchased from for warranty & guarantee information.
● Please note, the warranty does not extend to damage caused by post-purchase transportation, careless handling or
damage caused by misuse or modification.
● Treat your building annually with a quality, water resistant timber treatment to comply with the buildings
warranty.
