
IXG Monitoring Software (IXG
Supervision Tool) Operation Manual
IXG System
IP network-compatible intercom
Software version: 1.0.0.0 or later
Important
• Read this "Operation Manual" before you start using the device to ensure safe and correct operation.

2
Table of contents
Introduction
1. Notational symbols in this manual ........................................................................................ 4
2. Device type .......................................................................................................................... 5
3. Product manuals .................................................................................................................. 6
4. IXG Supervision Tool ........................................................................................................... 7
Installation and Startup
1. System requirements ........................................................................................................... 9
2. Installing the IXG Supervision Tool .................................................................................... 10
3. Login .................................................................................................................................. 12
Menu Bar
1. File ..................................................................................................................................... 14
1.1 Address Book .............................................................................................................. 14
1.2 Notification area .......................................................................................................... 20
1.3 Close Program ............................................................................................................ 21
2. Edit ..................................................................................................................................... 22
2.1 Test Settings ............................................................................................................... 22
2.2 Software Settings ........................................................................................................ 28
3. Tools .................................................................................................................................. 30
3.1 Error Status ................................................................................................................. 30
3.2 History ......................................................................................................................... 34
4. View ................................................................................................................................... 35
5. Help .................................................................................................................................... 36
5.1 About ........................................................................................................................... 36

Introduction
This manual provides details on Monitoring Software (IXG Supervision Tool).
The IXG System offers a separate manual for Installation, Settings, and Operations. Refer to the relevant manual.
For questions or support on how to setup and operate IXG Series products and software, refer to our Web site "https://
www.aiphone.net/support/."

4
Introduction
1. Notational symbols in this manual
The following symbols identify important information concerning operational procedures.
• Terms displayed on a PC are indicated as "[XXXX]."
• Page reference are shown as "Title (→ page XX)," (→ page XX), or page XX.
• The illustrations and screen shots in this manual may vary from the actual ones.
Indicates that users may require caution (including warning / caution).
Restricts user actions / provides instructions.
Tips and additional information for operation.

5
Introduction
2. Device type
The stations are shown as below.
※1 Scheduled for release in the 3rd quarter of 2020.
※2 Japan only
Device Type Example Model Name
Tenant Stations IXG-2C7(-*) IXG-2C7, IXG-2C7-L
Master Stations IX-MV7-* IX-MV7-HW, IX-MV7-W, IX-MV7-HB, IX-MV7-B
Guard Stations IXG-MK
IXG-MK
※1
Video Entrance Stations IXG-DM7(-*) IXG-DM7, IXG-DM7-HID
Video Stations IX-DV, IX-DVF(-*) IX-DV, IX-DVF, IX-DVF-P, IX-DVF-L, IX-DVF-
2RA, IX-DVF-RA
IX-DA IX-DA
IX-EA, IX-EAU
IX-EA, IX-EAU
※2
Audio Stations IX-SSA(-*) IX-SSA, IX-SSA-2RA, IX-SSA-RA
IX-BA IX-BA
IX-FA
IX-FA
※2
Lift Control Adaptor IXGW-LC IXGW-LC
Gateway Adaptor IXGW-GW IXGW-GW
Intercom Application
(AIPHONE IXG)
Intercom App ASP-IXGI, ASP-IXGA

6
Introduction
3. Product manuals
Read the "Installation Manual," "Setting Manual," and "Operation Manual" as needed. Have the person who installs or
configures the product refer to the relevant manuals.
Installation Manual (comes with each station.)
Refer to when installing and connecting each station. (For installers)
The manuals listed to the right can
be found on our Web site at "
https://
www.aiphone.net/product/support/"
for download and reference.
Download and refer to these
manuals as necessary.
IXG Support Tool Setting Manual (Electronic format (PDF file).)
Describes how to configure and maintain the system using IXG Support Tool. (For system
administrator)
Monitoring Software (IXG Supervision Tool) Operation Manual (Electronic format
(PDF file).)
Describes how to use the IXG Supervision Tool. (For system administrator)
Operation Manual (Electronic format (PDF file).)
Describes how to use each station. (For user)
Installation Manual (Electronic format (PDF file).)
Describes how to install each station. (For installers)
Installation Manual

7
Introduction
4. IXG Supervision Tool
IXG Supervision Tool can be used for line supervision. You can monitor up to 9,999 stations. (Mobile stations cannot
be monitored.)
Configuring the Address Book and IXG Support Tool Settings will cause IXG Supervision Tool to automatically run in
the notification area and begin monitoring when the PC starts.
Line supervision
By checking the response to a ping, this feature confirms that the station is properly connected to the network.
Line supervision can be performed using the three following methods.
• Automatically monitor at preset time
• Automatically monitor at preset intervals
• Manually monitor when required
Line supervision logs history. Check these monitoring results as necessary. Configure the application to send the logs
via email to the specified address.

Installation
and Startup

9
Installation and Startup
1. System requirements
PC requirements for using the IXG Supervision Tool.
Operating System Windows 7 Professional (SP1), Windows 7 Enterprise (SP1), Windows 7 Ultimate (SP1)
Windows 8, Windows 8 pro, Windows 8 Enterprise
Windows 8.1, Windows 8.1 pro, Windows 8.1 Enterprise
Windows 10 Home, Windows 10 Pro, Windows 10 Enterprise
CPU 32 bit (x86) processor or 64 bit (x64) processor of 1 GHz or higher
Memory 4 GB RAM or higher
Resolution 1280x768 or greater
Note
• Set the display size setting of your PC to “100%”.
If set to a setting other than “100%”, the screen of the IXG Supervision Tool may not be displayed correctly.

10
Installation and Startup
2. Installing the IXG Supervision Tool
1. Access our Web site "https://www.aiphone.net/product/support/" and download the monitoring
application onto the PC.
2. Double-click the downloaded file ("AIPHONE_IXG_SupervisionTool_Setup.exe") to install IXG
Supervision Tool.
3. Select the components to install for IXG Supervision Tool, and then click [Next].

11
Installation and Startup
4. Click [Finish].
*IXG Supervision Tool is now installed.

12
Installation and Startup
3. Login
1. Double-click any of the following.
• The "AIPHONE IXG SupervisionTool" shortcut that was created on the desktop
• "AIPHONE IXG SupervisionTool" in the Start Menu
• "Local Disk (C)" - "Program Files" - "Aiphone" - "IXG" - "SupervisionTool" -
"AIPHONE_IXG_SupervisionTool.exe"
* After installing, configuring the Address Book and Test Settings will cause IXG Supervision Tool to
automatically run in the notification area and begin monitoring when the PC starts.
2. Enter "ID" and "Password," and click [Login].
• The "Error Status" screen is displayed.
• When first logging into the IXG Supervision Tool, the Address Book Registration window will be displayed.
Refer to “Address Book (→page 14)” and register the Address Book.
The default ID and Password are "admin."

Menu Bar

14
Menu Bar
1. File
1.1 Address Book
Register a new Station List.
Click "File" - "Address Book." The "Address Book" screen will be displayed.

15
Menu Bar
1.1.1 Registering a new Address Book
1. Click [Import].
2. Click [Yes].
• Click [No] to return to the "Address Book" screen without importing.
3. Select the file to import and click [Open].
• The Address Book file to import can be created from IXG Support Tool. Refer to the "IXG Support Tool
Setting Manual."
4. Click [OK].

16
Menu Bar
5. Click [OK].
• Once a message is shown indicating that the process is complete, click [OK].
* The information can be entered manually to register in the Station List.
• When registration is completed, the "Error Status" screen will be displayed. “Error Status (→page 30)”
■ Building Number
■ Unit Number
■ Station Number
■ Station Name
Description Set the building number.
Settings 01 - 99
Default value -
Description Set the unit number.
Settings Single building system: 3-4 digits
Multiple building system: 3-10 digits
Default value -
Description Set the station number.
Settings Single building system (except for IXGW-LC, IXGW-GW, Intercom App): 3-5 digits
Multiple building system: 3-24 digits
Default value -
Description Set the station name.
Settings 1-24 alphanumeric characters
Default value -

17
Menu Bar
■ Station Type
■ IP Version
■ IPv4 Address
■ IPv6 Address
Description Select the station type.
Settings • IX-MV7-*
• IX-DV, IX-DVF(-*)
• IX-EA, IX-EAU
• IX-DA
• IX-SSA(-*)
• IX-FA
• IX-BA
• IXG-2C7(-*)
• IXG-DM7(-*)
• IXG-MK
• IXGW-LC
• IXGW-GW
Default value -
Description Select the Protocol.
Settings • IPv4
• IPv6
Default value -
Description Set the IPv4 Address of the station.
Settings 1.0.0.1 - 223.255.255.254
Default value -
Description Set the IPv6 Address of the station.
Settings 2000::0 - 3FFF:FFFF:FFFF:FFFF:FFFF:FFFF:FFFF:FFFF or FD00::0 -
FDFF:FFFF:FFFF:FFFF:FFFF:FFFF:FFFF:FFFF
Default value -

18
Menu Bar
1.1.2 Exporting a registered Address Book
Export a registered Station List to a file.
1. Click [Export].
2. Select the location to export the registered Station List, and save the file using another file name.
• Once a message is shown indicating that the process is complete, click [OK].

19
Menu Bar
1.1.3 Deleting stations from a registered Address Book
Delete stations from the Station List (for example, when replacing a station).
1. Click select of the station to be deleted.
• Click [Select] to select all stations registered to the Address Book.
• Click [Unselect] to remove the checks from all stations.
2. Click [Station Removal].
• When the confirmation message is shown, click [Yes].
• Once a message is shown indicating that the process is complete, click [OK].
3. Click [OK].
• Once a message is shown indicating that the process is complete, click [OK].

20
Menu Bar
1.2 Notification area
Select "File" - "Notification area." The screen will be minimized and will be moved to the notification area.
To view the monitoring application, double-click or right-click and choose the item to be viewed.

21
Menu Bar
1.3 Close Program
Click "File" - "Close Program." The following screen will be shown.
1. Click [Yes] to close IXG Supervision Tool.

22
Menu Bar
2. Edit
2.1 Test Settings
Configure the monitoring method for automatic line supervision, the notification method for monitoring results, and
various settings when sending monitoring results by email.
Click "Edit" - "Test Settings." The "Test Settings" screen will be displayed.
■ How to configure
1. Configure each item.
2. Click [OK].
• When registration is completed, the "Error Status" screen will be displayed. “Error Status (→page 30)”

23
Menu Bar
2.1.1 Automatic Settings
■ Line Supervision Test Method
■ Schedule Settings (Line Supervision)
■ Periodical Time (Line Supervision)
2.1.2 Pop-up Message
■ Pop-up Error Message
Description Select how to perform Line Supervision.
Settings • Schedule: Automatically monitor the line at the specified time.
• Periodic: Automatically monitor the line during the specified period.
• Manual: Do not automatically monitor the line.
Default value Manual
Description If “Line Supervision Test Method (→page 23)” was set to "Schedule," set the day of the week
and time to automatically monitor the line.
Settings Day of the week:
• Daily
• Sun
• Mon
• Tue
• Wed
• Thu
• Fri
• Sat
Time:
• 00:00-23:59
Default value Sun
00 Hour 00 Minute
Description If “Line Supervision Test Method (→page 23)” was set to "Periodic," set the period for which to
automatically monitor the line.
Settings • 15 sec
• 20 min
• 30 min
• 60 min
Default value 15 sec
Description Configure whether to display monitoring results in a pop-up message.
Settings • Enable
• Disable
Default value Enable

24
Menu Bar
2.1.3 Email Notifications
■ Send Test Results
2.1.4 Email
If “Send Test Results (→page 24)” was set to "Send," be sure to configure this setting.
2.1.4.1 Server Settings
■ SMTP Server
■ SMTP Port
■ SMTP Encryption
2.1.4.2 Authentication Settings
■ SMTP Authentication
■ Mode
Description Enable / Disable Email notification to send the monitoring result.
Settings • Send
• Disable
Default value Disable
Description Set the SMTP server.
Configure either the IP address or hostname.
If configuring using the hostname, also configure the DNS server settings on the PC.
Settings 1-255 alphanumeric characters
Default value -
Description Set the port number for SMTP.
Settings 1-65535
Default value -
Description Select the encryption type for SMTP.
Settings • Disable
• TLS
• STARTTLS
Default value Disable
Description Enable SMTP authentication.
Settings • Enable
• Disable
Default value Disable
Description Select the SMTP Authentication Mode.
Settings • LOGIN
• CRAM-MD5
Default value LOGIN

25
Menu Bar
■ ID
■ Password
2.1.4.3 Email Addresses
■ Destination 1
■ Destination 2
■ Destination 3
■ Source Address
2.1.4.4 Email Event Trigger
Configure which trigger to use to send email for the addresses for "Destination 1" through "Destination 3."
■ Line Supervision (Passed)
■ Line Supervision (Failed)
Description Set the ID for SMTP authentication.
Settings 1-64 alphanumeric characters
Default value -
Description Set the Password for SMTP authentication.
Settings 1-64 alphanumeric characters
Default value -
Description Set the email address.
Settings 1-64 alphanumeric characters
Default value -
Description Set the email address.
Settings 1-64 alphanumeric characters
Default value -
Description Set the email address.
Settings 1-64 alphanumeric characters
Default value -
Description Set the source email address.
Settings 1-64 alphanumeric characters
Default value -
Description Send email when Line Supervision is "Passed".
Settings • Enable: Send
• Disable: Do not send
Default value Disable
Description Send email when Line Supervision is "Failed".
Settings • Enable: Send
• Disable: Do not send
Default value Disable

26
Menu Bar
2.1.4.5 Email Subject
Set up the subject text of email message for each trigger.
■ Line Supervision (Passed)
■ Line Supervision (Failed)
Description Set the subject of the email when Line Supervision has passed.
Settings 0-64 alphanumeric characters
Default value -
Description Set the subject of the email when Line Supervision has failed.
Settings 0-64 alphanumeric characters
Default value -
Important
• [UTF-8] used for "Subject" encoding, the subject may be incorrectly decoded depending on mail server.

27
Menu Bar
2.1.4.6 Send Test Email
Send a test email message to the email address specified in “Email Addresses (→page 25)”.
■ How to send the test e-mail
1. Click [Send].
2. The following email will be sent to the specified e-mail address.
Example of sending an email message:
If "System Name:" in “Software Settings (→page 28)” was set to "Supervision Tool"
From *****@*****.com
Date and time 2020/11/20 15:22
To
CC
Subject Supervision Tool Email Test
Description Test email sent at "2020/11/20 15:22:46."
Station Number: "-"
Station Name: "SupervisionTool"
Unit Type: "-"

28
Menu Bar
2.2 Software Settings
Set the administrator ID and password to use to login to IXG Supervision Tool. Also set the system name and IP
version. The Installer Information, Owner Information, and Notes entered here will be displayed in the "About" screen.
“About (→page 36)”
Click "Edit" - "Software Settings." The "Software Settings" screen will be displayed.
■ How to configure
1. Configure each item.
• Items marked with ♦ must be configured.
2. Click [OK].
• Click [Cancel] to quit without registering.

29
Menu Bar
2.2.1 Software Settings
2.2.1.1 ID and Password
■ ID(Administrator)♦
■ Password(Administrator)♦
■ Confirm Password♦
2.2.1.2 System settings
■ System Name:♦
■ IP Version♦
■ Installer Information
■ Owner Information:
■ Notes:
Description Set an ID to log into IXG Supervision Tool.
Settings 1-32 alphanumeric characters
Default value admin
Description Set a password to log into IXG Supervision Tool.
Settings 1-32 alphanumeric characters
Default value admin
Description Enter the "Password(Administrator)" again.
Settings 1-32 alphanumeric characters
Default value admin
Description Change the system name.
Settings 1-64 alphanumeric characters
Default value SupervisionTool
Description Set the IP version for IXG Supervision Tool.
Settings • IPv4
• IPv6
Default value IPv4
Description Enter the installer information.
Settings 1-64 alphanumeric characters
Default value -
Description Enter the owner information.
Settings 1-64 alphanumeric characters
Default value -
Description Enter the notes.
Settings 1-64 alphanumeric characters
Default value -
30
Menu Bar
3. Tools
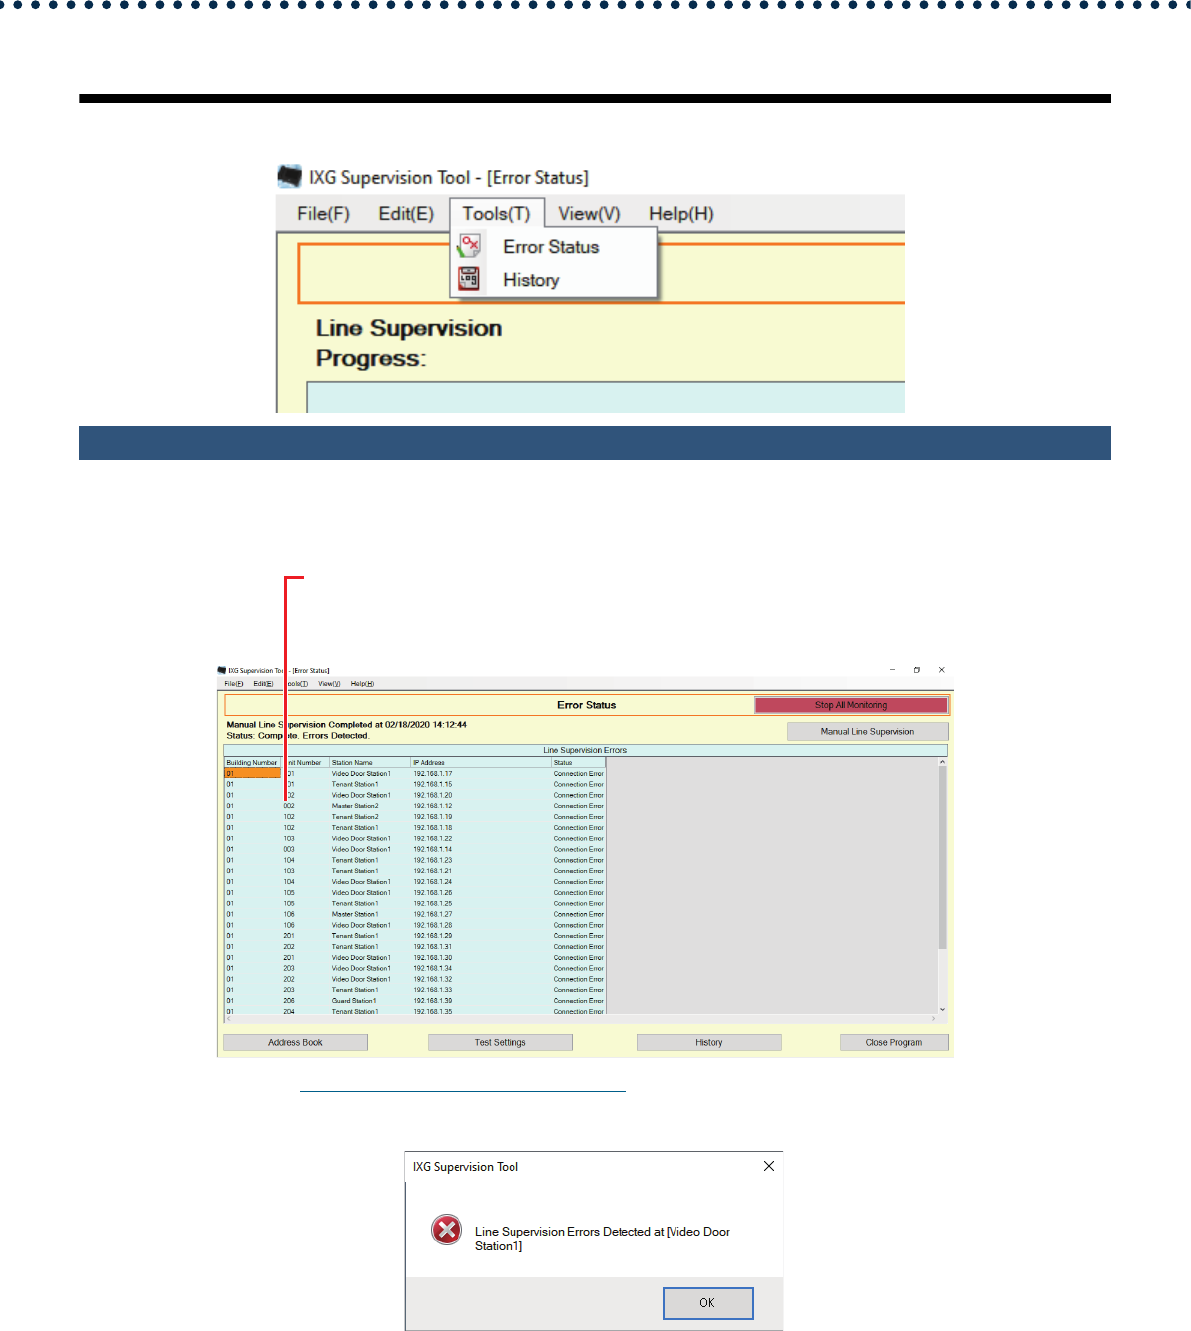
3.1 Error Status
Monitor the stations in the system for any failure.
Click "Tools" - "Error Status." The "Error Status" screen will be displayed.
When "Enable" is set for “Pop-up Error Message (→page 23)”, the following screen will be shown if an error is
detected.
The information of the stations for a communication error will be shown.
* Even when the network itself is working properly, a failure may be detected if a station is faulty.

31
Menu Bar
Even if the error is restored or a new error occurs, the screen will not be automatically refreshed. To refresh the
screen, refer to “Manually checking monitoring (→page 31)” and manually confirm monitoring again. The screen will
be refreshed periodically if "Schedule" or "Periodic" was configured.
■ Manually checking monitoring
1. Click [Manual Line Supervision]. The "Select Manual Line Supervision Station" screen will be
shown.
2. Check of the station to be monitored.
• Click [Select] to select all stations registered to the Address Book.
• Click [Unselect] to remove the checks from all stations.
Refer to page 14
Refer to page 22
Refer to page 34
Refer to page 21

32
Menu Bar
3. Click [Upload] to start monitoring confirmation.
• Click [Cancel] to return to the "Error Status" screen without confirming monitoring.
* It may take some time to finish monitoring confirmation depending on the number of stations. To cancel
monitoring confirmation, click [Cancel].
4. When monitoring is finished, the error status will be displayed.
When "Enable" is selected for “Pop-up Error Message (→page 23)”, the monitoring result will be shown if an
error is detected. Click [OK].
Progress rate: Number of checked stations / Number of selected stations
If no errors were detected, the screen will display a message ("Status: Complete. No Errors Found.").
Date and time when the station was monitored

33
Menu Bar
■ Stopping all monitoring
1. Click [Stop All Monitoring].
2. Click [Yes].
• Click [No] to return to the "Error Status" screen without stopping all monitoring.
3. [Stop All Monitoring] changes to [Resume Monitoring].
• To resume line supervision, click [Resume Monitoring].

34
Menu Bar
3.2 History
Check the communication error history.
Click "Tools" - "History." The "History" screen will be displayed.
Select "Line Supervision," the year/month/day, and the results (all, ✔: Normal, or ×: Error), and then click [Apply] to
display the monitoring history.
Set date and time:
The date and time at which monitoring was
performed will be shown.
Test Type:
Displays whether monitoring was
performed manually or automatically.
Information on the monitoring
station will be shown. (Building
Number, Unit Number, Station
Name, IP Address)
Result:
The result of the monitoring will be shown.
✔: Normal
×: Error
Checklist:
Not used.
Errors:
Not used.

35
Menu Bar
4. View
Set the language of following items.
• The display of IXG Supervision Tool.
• The input text language of setting item. (Station List, etc).
• The content of the email message.
1. Click "View" - "Language" to switch to the selected language.


Issue Date: Mar.2020 Ⓐ 0320 RQ 62137
AIPHONE CO., LTD., NAGOYA, JAPAN
https://www.aiphone.net/
